Category Archives: Main

Chicken Broccoli Casserole

Standard
Chicken Broccoli Casserole is classic Midwestern cooking

Chicken Broccoli Casserole is classic Midwestern cooking

Chicken broccoli casserole only has easy ingredients

Chicken broccoli casserole only has easy ingredients

This is a recipe my mom used to make ALL THE TIME when I was a kid.  It is a great casserole that hits all of my favorite casserole features – one-dish meal, veggies and meat all in one, cream of chicken soup and cheese.  Seriously, could you ask for more?  It is great on a cold day to warm you up from the inside and make you happy.

My mom always served it with crescent rolls, a rare treat for us.  I still always grab a tube when I make this.  And if you want to be totally Wisconsin, have some bars for dessert.  7-layer bars would do nicely.

In this day and age of easy prep, you can get pre-cooked chicken in the freezer section if you want to skip over that.  I see no reason why that would be any different than baking up some chicken the night before you make it.

And if you are from Minnesota, please read the title of this dish as Chicken Broccoli Hotdish.

Layer the chicken, then broccoli, then the sauce and then cheese

Layer the chicken, then broccoli, then the sauce and then cheese

3-4 chicken breasts, cooked* and cut up
1 bag frozen broccoli, thawed
2 cans cream of chicken soup
1 big scoop of mayonnaise
1/2 tsp curry
1 tsp lemon juice
cheddar cheese

*Cook chicken at 350 for 30 min (can be done the night before).  I usually just leave it completely plain or sprinkle a little curry on it.  It’s going in a casserole, this is not a time to be fancy.  Cut up.

Place chicken in the bottom of a greased casserole dish.  Sprinkle broccoli over chicken.  In a separate bowl, mix soup, mayo, curry and lemon juice.  Spoon over broccoli.  Top with cheddar.  Bake at 350 for 45 min or until bubbly.

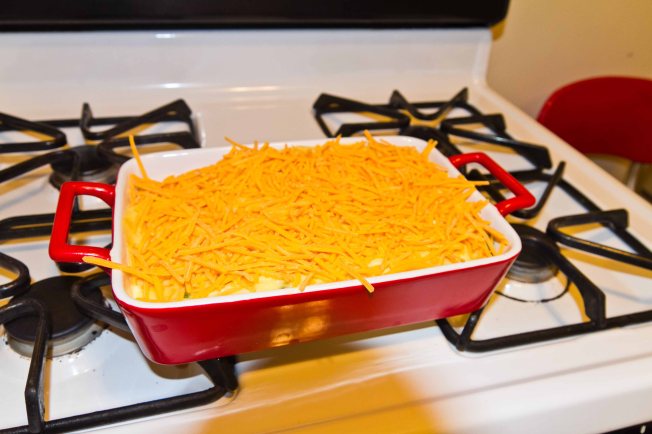
Before it goes in the oven - all layered goodness

Before it goes in the oven – all layered goodness

Sorry that I have shadows of my head in all the pictures.

Lamb (or Beef!) Tagine with Herbed Couscous

Standard
Lamb tagine with herbed couscous and grilled eggplant

Lamb tagine with herbed couscous and grilled eggplant

Sorry it has been such a long break in writing, but we’re selling our house and I feel like I’ve been banished from my kitchen!  However, I did sneak in to make some lamb tagine recently and took some pictures of it.  Don’t like lamb?  See below for substituting beef!  For you moms who are dealing with hungry kids and no time for cooking, this nice thing about this one is you pop it in the crockpot in the morning and have dinner when you get home from work.  Disclaimer: that does mean some work the night before.

I learned how to make chicken at a Moroccan cooking class at Cooks of Crocus Hill.  It is my go-to for company that I want to impress.  This is its sister – lamb tagine.  The secret is that isn’t all that hard to make and you can do it all ahead.  It is all about cooking it low and slow.  Since lamb takes a long time to cook, I usually get it to the point where it needs to simmer the night before.  I pop it in a crock pot and put it in the fridge until the next morning.   The lamb/beef needs to go all day in the crock pot so it is just fall apart tender.  The bonus is that it gives all the other flavors plenty of time to meld together into the ultimate comfort food.  If you are entertaining, no need to keep running in the kitchen or worry if your guests are late.  This is the most forgiving recipe ever.

Prepping your ingredients makes it easier

Prepping your ingredients makes it easier

We love lamb, but if that is not your thing, you can substitute in beer.  I would recommend cuts that are meant for stewing since you also want the beef to cook for a good long time.  The main thing you are looking for are tougher cuts of meats that turn tender and delicious with cooking for a long time.  Look for Chuck, Chuck Shoulder, Chuck Roast, Chuck-Eye Roast, Top Chuck, Bottom Round Roast, Bottom Eye Roast, Rump Roast, Eye Round Roast, Top Round, Round Tip Roast, Pot Roast, Stew Meat.  The beautiful thing about these meats is that they are cheaper than fancier cuts.  Also, cut down on your prep time by picking out your package of meat and then bring it up to the meat counter.  They can cut it up for you in a machine in back.  Tell them you want large pieces since they will shrink with all that cooking.

If you are not familiar with tagine flavors, it is a Moroccan method of cooking meat.  Tagine is actually a kind of pot that is shallow with a tall cone with a point on top.  The steam circulates during cooking making the meat tender.  In this recipe, the crockpot fills in nicely.  The flavors are a mix of turmeric, cinnamon, allspice, nutmeg, saffron, ginger and cardamon.  The dish is a mix of meat, tomatoes, chickpeas and dried apricots, so there is a great mix of textures as well.  You can swap in or out anything into it.  Sweet potatoes are good and any other veg that can handle long-term cooking.

I find that prepping this one is helpful.  It tends to go more quickly than you think, so having the onions, garlic and fruit cut up and ready to go makes life easier.

Serve it with the herbed couscous, the recipe follows.

 Lamb (or Beef) Tagine

Brown the lamb in small batches so you get a nice crust on the meat

Brown the lamb in small batches so you get a nice crust on the meat

Vegetable or olive oil for sautéing
Half of boneless leg of lamb, about 2 pounds, or similar cut*, large cubes, or 2 pounds (approximately) of beef – see note above for appropriate cuts.
Salt and pepper
1 large onion, chopped
12 cloves garlic, minced
2 T Ras el Hanout**
2 large pinch of saffron soaked in 1/2 c warm water
2 cinnamon stick
2- 15 oz can of diced tomatoes
2- 15 oz can of chickpeas
1 c apricots cut into strips (any dried fruit works, just go with what you like)

* I get our lamb at Costco.  A boneless leg of lamb is huge, so I cut it in half and freeze it.  Cut it into larger cubes – about 2″ cubes is great.
*  Ras el Hanout is a Moroccan spice.  The recipe follows or you can buy it online.  I like Saffron Restaurant’s version of it.  It is a Moroccan restaurant in Minneapolis that sells their spices online (although be sure to get their Ras el Hanout and not the tagine spice.  The Ras el Hanout is better).  Williams Sonoma also makes one, but they have redone theirs since I last bought it.  Premade ones are expensive, but you generally get a lot in a package and you’ll

Use the onions (and their juices) to pull up the tasty bits attached to the pan

Use the onions (and their juices) to pull up the tasty bits attached to the pan

spend more buying all the ingredients to make it yourself if you don’t have most of it on hand already.  For those of you with big spice racks, make it from what you’ve got!

Cut and dry the meat with paper towels.  You want to make sure the lamb is as dry as possible.  Season with salt and pepper (I usually just season the side that is exposed to me, then make sure that gets put down in the pan, then season the other side once the meat is already cooking).

Heat 2 T of oil over medium-high heat in a heavy frying or braising pan, ideally avoid non-stick pans since it is hard to get a nice crust with those.  “Sticky” pans are much better for this.  Add lamb to the pan spaced out so the pieces don’t touch each other.  You’ll .  You may need to do this in 2-3 batches.  Brown the meat – high heat, no stirring for a few minutes per side.  Set the cooked meat aside and do the next batch.  Add oil as necessary.

Add a little more oil to the pan if needed and onions until they just start carmelizing.  While they are cooking, use a wooden spoon to pull up all the baked-on fond, the bits of meat that carmelized to the pan.  Add in the garlic and cook for 30 sec.  Add in the ras el hanout and cook for another 30 sec.  Add in the saffron in water, cinnamon stick, tomatoes, chickpeas and apricots.  Stir well and bring to a simmer.

The onion-tomato-chickpea-apricot mixture in the crockpot before adding in the lamb

The onion-tomato-chickpea-apricot mixture in the crockpot before adding in the lamb

Put the whole mixture into the crockpot and add in the meat.  Stir to combine.  If you are doing this the night before, put it all in the fridge.  (It can be stored in whatever fits in your fridge, just get it in the crockpot before starting up again.  Put the crockpot on high until the whole mixture simmers (starting to bubble on the edges).  This should not take more than half and hour, if that.  Turn down to low and forget about it.  For at least 8 hours.  Ideally a good 12 hours.

Serve with herbed couscous (recipe below).

Ras el Hanout

1-1/4 tsp allspice
2 tsp ground nutmeg
20 threads of saffron, crumbled
1/2 T black pepper
1/2 T ground mace
1 tsp ground cinnamon
1/2 T ground cardamom
2 tsp ground ginger
2 tsp salt
1 tsp turmeric

Combine in an airtight container.

Herbed couscous

This is another winner from my Moroccan cooking class.  Couscous has to be one of the easiest foods to make.  This recipe jazzes it up to make it into a dish.  I do not always buy all the herbs and sometimes just sub out if I have other herbs on hand.  I check out what else I have in the fridge from other recipes and throw that in.   The onion, broth and lemon juice ensure no matter what else you do, it will be good.  If you do the full recipe, you are in for a really great treat!

1 medium onion, finely chopped
2 T olive oil, divided
1 garlic clove, minced
2 c beef broth (chicken works too)
1-10 oz box of couscous (1-1/2 c)
¾ tsp salt, to taste
½ c chopped Italian flat leaf parsley
½ c chopped basil
1/3 c chopped mint
1-2 T lemon juice

Heat 1 T of the olive oil in a medium-sized pot over medium heat.  Add the onion and let caramelize, stirring occasionally.  Add in garlic and cook for 30 sec.

Add in broth, raise the heat to high and bring to a boil.  Stir in the couscouse, cover and remove from heat.  Let stand for 5 minutes.

Fluff the couscous with a fork, stir in herbs, 1 T of lemon juice and 1 T olive oil.  Taste to make sure it has the right lemon/olive oil/salt/pepper that you like.  Serve nice and hot.


Roasted Shrimp and Orzo

Standard

This just tastes like summer!  If you grow herbs, they are getting big enough to be using, which makes this a perfect easy addition to your summer repetoire of one-dish meals.  The fresh herbs make this meal, so don’t use dried.  It is totally worth the splurge to buy them if you don’t grow them.  The orzo can be regular or whole wheat.

I love this dish for entertaining because you can make it ahead, toss it in the fridge and pull it out when you sit down to dinner.  And yet, it is a one-dish meal.  You can add a salad on the side to round it out.  Sorry there is no picture.  I’m surprised I don’t have one because I have made it a lot of times.

If you don’t want to turn on the oven in the summertime, you could grill the shrimp as well.

Note for food allergy people – if you (or your guests) are allergic to parts of the recipe, you can pull out some of the dish before adding in the offending item and then they still get to eat what everyone else has, but you don’t have to make an entirely different meal for them.  I served this at book club with a shrimp-free option and a feta-free option.

Kosher salt
Good olive oil
3/4 pound orzo pasta (rice-shaped pasta)
1/2 c freshly squeezed lemon juice (2-3 lemons)
Freshly ground black pepper
2 pounds (16 to 18 count) shrimp, peeled and deveined
1 c minced green onions, white and green parts
1 c chopped fresh dill
1 c chopped fresh flat-leaf parsley
1 cucumber, seeded, and medium-diced
1/2 c small-diced red onion
3/4 pound good feta cheese, large diced

Preheat the oven to 400 degrees F.

Fill a large pot with water, add 1 tablespoon of salt and bring the water to a boil. Add the orzo and simmer for 9 to 11 minutes, stirring occasionally, until it’s cooked al dente. Drain and pour into a large bowl. Meanwhile whisk together the lemon juice, 1/2 cup olive oil, 2 teaspoons salt and 1 teaspoon of pepper. Pour over the hot pasta and stir well.

While the orzo is cooking, place the shrimp on a sheet pan, drizzle with olive oil, and sprinkle with salt and pepper. Toss to combine and spread out in a single layer. Roast for 5 to 6 minutes, until the shrimp are cooked through. Don’t overcook!

Add the shrimp to the orzo and then add the green onions, dill, parsley, cucumber, onion, 2 teaspoons salt, and 1 teaspoon pepper. Toss well. Add the feta and stir carefully. Set aside at room temperature for 1 hour to allow the flavors to blend, or refrigerate overnight. If refrigerated, taste again for seasonings and bring back to room temperature before serving.

Bengali Egg Rolls

Standard
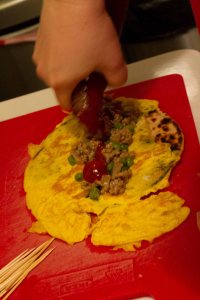
Egg roll before it is rolled - parathas, egg, keema and sauce, yum!

Egg roll before it is rolled – parathas, egg, keema and sauce, yum!

This is part 3 in a 3 part series of recipes that go together – parathas, keema and Bengali egg rolls.  They are called egg rolls because they actually have eggs in them, so forget Chinese egg rolls and give these a try. This is one of Arvind’s all-time favorite dishes.  You can tell, he stopped taking picture once they were almost assembled.  It is a snack, but if you make enough of them, they can become a meal.

The filling is extremely flexible and is nearly begging for you to add your own fusion style here.  For this recipe, I’m going with keema (see recipe in meat section), but you can put any leftovers you have in there that is not too liquidy.  The recipe is for 4 egg rolls, but you can see how to easily move it up or down to fit any quantity you want.  Also, prepare to be hooked on parathas, the most wonderful Indian bread ever.  The directions are in excruciating detail, so don’t worry, it sounds like more work than it is.  They are actually super quick once you get everything assembled.

Get all your ingredients laid out ahead of time - it goes quickly

Get all your ingredients laid out ahead of time – it goes quickly

Ingredients
4 eggs
½ of an onion, finely chopped (if you have onions in your meat, you can skip this)
1 c keema, (but see notes below)*
Maggie Hot and Sweet Sauce**
Cilantro for garnish
4 parathas, still frozen***
toothpicks

Notes
*  You just want finely chopped meat (or nice veggie) here for contrasting flavors.  I like keema (here’s a link to the recipe), but you could used chopped up cooked chicken (like leftover from rotisserie chicken), cooked hamburger, leftover Indian dishes that aren’t too saucy, etc.  Or go fusion and come up with something entirely different!

Heat up parathas and then start the first egg when they are almost done

Heat up parathas and then start the first egg when they are almost done

**Maggie Hot and Sweet sauce is sort of an Indian ketchup. Their tagline is “It’s Different!” and it is.  It is also great on scrambled eggs, potatoes, etc.   It has a little heat and is a little sweet
*** For paratha directions, see the blog on how to make parathas (click here).

Directions
Crack eggs into a bowl with a lip (like a measuring cup).  Scramble them.  Set aside.  If you like raw onions, set those aside.  If you don’t, brown the onions and set aside.  Heat up the meat.  Have the Hot and Sweet sauce and cilantro ready to go. (You may want to taste the sauce to make sure you like it before adding it to the food.  Arvind does not like it, I love it.)  Get your toothpicks handy.

Put the cooked paratha on the egg as it cooks

Put the cooked paratha on the egg as it cooks


Heat up a paratha according to my previous post.

Meanwhile heat up a second non-stick pan over medium heat.  When the paratha is almost done, put some oil in the second pan and pour in about 1 egg’s worth into the center of the pan and do not touch it.  You’ll see the egg start to set. When that happens, put the cooked paratha on top of it.  Use a spatula to push the paratha down into the egg.  Then use the spatula to get under the egg and paratha in one go and flip it over (they’ll go together).  Then transfer the paratha, egg-up onto a work area.

Take the paratha/egg off the heat and add the filling.  (There is a litte too much egg on this one)

Take the paratha/egg off the heat and add the filling. (There is a litte too much egg on this one)

Top the paratha with meat, onions, sauce and cilantro.  Roll it up and secure it with some toothpicks.   Set that one aside and continue on making the rest of them the same way.  Arvind and I create an assembly line – he makes the parathas.  I do the egg and fill them.  It goes really fast, so that is why you want have everything all ready to go before you start.

The basic thing is paratha and egg with a little something else mixed in.  Have fun experimenting with flavors you like or leftovers you don’t know what to do with.  Think of it like I’m giving you the recipe for burritos.  Sure, this combo is good, but really, you can mix and match up stuff you like.

Post combinations below that you like so other people can enjoy your combinations.

Sushi

Standard

Making sushi at home can seem intimidating, but it is a ton of fun!  It is far, far cheaper than eating it out, but generally is less pretty at home too.  Arvind is not a huge fan and he is traveling, so my friend and co-sushi-chef Nikki came over to make a ton of sushi before watching Game of Thrones.  Sushi is one of those dishes that is more prep than cooking, so make sure you do all your prep work before you start rolling.  Also, I tried to cover a ton of different kinds of sushi in one go, so this is a looooooooong post. Apologies in advance!  You can focus on the ingredients and types you like.  That is the beauty of making sushi at home – you control what you make, so every roll has stuff you love in it.

Sushi for 4: tuna, spicy tuna, eel, salmon, cream cheese and veggies all in various rolls, tuna and eel on the side, served with wasabi, eel sauce and roasted asparagus

Sushi for 4: tuna, spicy tuna, eel, salmon, cream cheese and veggies all in various rolls, tuna and eel on the side, served with wasabi, eel sauce and roasted asparagus

I have covered: making sushi rice, tezu (which is necessary when using sushi rice), prepping ingredients, making spicy tuna and eel sauce, rolling up rolls and making sashimi.   In addition to the ingredients, you will need a sushi mat.  It is a bamboo mat that helps you roll the sushi up.  You can get them from most Asian grocery stores.

Before getting started, let me state – sushi is raw fish so please be careful and follow strict food safety rules.  You don’t want to get sick from your sushi.  Part of being safe is to make sure that the fish you buy is sushi-grade.  Confirm that when you buy your fish.  Oh, and since this is just the internet and I can’t watch you – I take no responsibility for your cooking!

Sushi Rice

This is the backbone to everything you’re going to make.  While you’re at the store picking up your mat, pick up sushi rice.  Other rices won’t cut it because they aren’t sticky enough.  This recipe made exactly the amount of rice you see in the picture above.
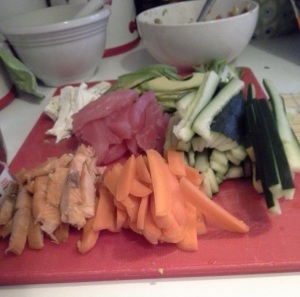
While your rice cooks, get all of your other ingredients prepped and put together for easy rolling.  Here we have a bowl of spicy tuna, cream cheese, tuna, avocados, cucumbers, green onions, carrots and smoked salmon.

While your rice cooks, get all of your other ingredients prepped and put together for easy rolling. Here we have a bowl of spicy tuna, cream cheese, tuna, avocados, cucumbers, green onions, carrots and smoked salmon.

Sushi rice
2c sushi rice (some brands are Kokuho, Nishiki or Calrose brand)
2c +2T water

Sushi Seasoning
1/4c rice vinegar
2-1/2 T  sugar
1/2 t salt
(Or 1/3 c premade sushi seasoning)

Wash rice until water is clear.  Drain in colander.  Add water and rice to heavy pot or rice cooker.  Bring to a boil, lower heat and continue steaming for 15 minutes more with the cover on at all times.  Remove from heat.  Spread a clean cloth (a dishtowel works great) over the pot and recover.  Let it sit 15 minutes more.

Mix rice vinegar, sugar and salt in a non-aluminum pan.  Heat and stir to dissolve sugar.  Cool.  Quickly add seasoned vinegar to the rice.  Mix it using a cutting motion.  Do not smash the kernels.  Keep it at room temperature (don’t refrigerate it).  Cover with the cloth and lid and use within an hour if possible.  The trick is it has to be cool enough to handle, but not too cold or it hardens.

Tezu

This is a very necessary liquid you will need as you make the sushi.  The rice is so sticky that it will stick to your hands.  I usually take out a bowl big enough to comfortably hold both of my hands.  I only fill it up about half way.  There is no exact science to the ratio, but the vinegar is the cutting-the-sticky agent.

½ bowl of water
2 T or so of rice vinegar
Mix together.

Sushi Ingredients

Frozen eel comes pre-cooked and ready to be cut up and microwaved

Frozen eel comes pre-cooked and ready to be cut up and microwaved

Items with at * are available at Asian grocery stores.  The most important thing to keep in mind when buying sushi ingredients is to buy sushi-grade.  No one wants to get sick.  Follow strict food safety rules.

Nori* – seaweed sheets used to make sushi.  You can toast them before using them.  Or not.
Eel*– available already cooked and in their delicious sauce in the freezer section of Asian grocery stores,  thaw in the fridge before using
Block of frozen sushi-grade tuna* –Make sure it is sushi grade!  Thaw in the fridge before using.  Sometimes it comes pre-sliced.

Blocks of frozen tuna come in different sizes and sometimes pre-sliced.  Make sure it is sushi-grade!

Blocks of frozen tuna come in different sizes and sometimes pre-sliced. Make sure it is sushi-grade!

Sushi-grade salmon – I cannot stress the importance of getting this one right.  You’ll have to buy it fresh, so get it from a place you really trust.  I will only go to Coastal Seafood and tell them it is for sushi.  Don’t let them take the skin off – you can fry that up for yumminess.
Various cut up veggies – you want to practice your julienne skills or pull out that julienne do-hicky in your drawer.  Carrots, cucumber, green onions and avocado (slices) are all my favorites
Cream cheese – if you’re into that.
Pickled ginger* – no need to do any prep to this, it comes pre-sliced
Wasabi powder* – just add water, you’ll be surprised at how much stronger it is when you “make” it yourself.
Mirin* – It is a sweet cooking wine critical for making eel sauce

Sushi Recipes

Before you start rolling up your rolls, you might want to whip up these recipes

You can mix and match ingredients to come up with interesting rolls.  Notice the tezu bowl above the rolls is handy for sticky hands.

You can mix and match ingredients to come up with interesting rolls. Notice the tezu bowl above the rolls is handy for sticky hands.

Spicy Tuna
This makes a TON of spicy tuna.  You can use it in rolls and you can add it to a salad the next day for lunch.  If you want to make a smaller amount, just adjust the quantities down, which is super easy since you have to adjust the flavors in this one as you go anyway.

1-1/2 – 2 c yellowfin tuna
6 green onions, thinly sliced
1-2T Sriracha, (to taste)
1-2T toasted sesame seed oil
1-2 cloves garlic minced
1 T soy sauce
Lots roe, optional

Start by cutting up about half of your your tuna. Make it as finely chopped as you can.  If you choose to go with a smaller amount of tuna, do even less than half of what is listed, just be sure to reduce everything else.  Add in about 3 of the green onions, a little of the chili sauce, a splash of the sesame seed oil, some garlic and roe.  Mix it all up well.  If it is bland, add in the rest of the green onion, garlic and more chili sauce to what you like.  The sesame oil can undo a little too much spiciness, but the best defense against that is more tuna.  Just keep tinkering with it until you love it.
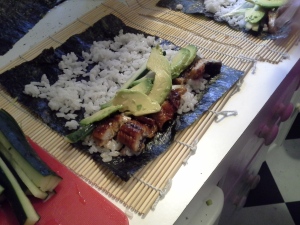
Don't forget to cut some eel in strips for rolls

Don’t forget to cut some eel in strips for rolls

Eel
Make sure the eel is thawed before starting.

1 package of eel

Take the eel out of the package.  Cut the eel lengthwise in half, then width-wise about 1-1/2” slices.  Arrange on a microwave plate and microwave for about 2 minutes, until you hear some popping.  Voila, ready to serve.  To use in rolls, slice the pieces even thinner.

Eel Sauce
Yes, that heavenly sauce that has moved from just eel to all sorts of rolls.  Make your own for dunking your rolls in instead of soy sauce.

1 part soy sauce
1 part mirin
Brown sugar, optional

Bring the soy sauce and mirin to a boil, reduce and simmer until it thickens, stirring occasionally.  As it thickens, taste and adjust as necessary.  The mirin makes it sweeter and the soy sauce saltier.  But if it is too far from where you want sweet-wise, add in a pinch of brown sugar.  It should be thick enough to coat a spoon.

Rolling up rolls

And now you’re ready to begin.  The good news is, this is one of those “prep is everything” dishes.  You are all set to get moving.  Hopefully the pictures will help you see what I’m talking about.

Use the mat to roll everything up nice and tightly

Use the mat to roll everything up nice and tightly

Set your bamboo mat so the bamboo runs side-to-side in front of you.  Put a piece of seaweed on it and take a handful of rice.  Spread the rice on as thinly as possible on the seaweed.  You may need to dip your hands in the tezu as you go since it will be sticky.  Make sure it is fairly evenly spread out side to side.  It is ok if it is heavier on the bottom of the sheet than the top.  As you can see, it doesn’t need to be a thick layer, but just try to keep things even side to side.

Now put your roll contents across the bottom of the sheet.  Don’t overfill them!  Then, using your mat, roll the seaweed up, starting at the bottom and rolling to the top.  You may find that you do some, rearrange your mat or adjust the roll and keep going.  Once it is rolled up, slice into bite size pieces and put on a serving platter.  Practice will really help with this.  Expect some not-so-pretty rolls to start with.

If you want the rice on the outside of the roll, put saran wrap around the mat, put the rice down first, then the seaweed on top of that, add in fillings and roll up.  (Personally, I find it too fussy to bother).

Sashimi

Form a rice ball that is almost football (American) shaped.  Set the fish or eel on top of it.  In our picture above, we didn’t bother with that, but did keep the eel and tuna handy for yummy eating on their own.

Drinking note

You can go with the usual sake or beer, but we have found a dirty martini is the perfect pairing with sushi.

In closing

Have fun experimenting with different combinations.  And it is always more fun in a group.  When Nikki and make sushi together, we prep everything together.  She did some time in culinary school, hence nicely sliced veggies.  I took the sushi class, so I make the spicy tuna.  Then form an assembly line.  Nikki comes up with combos, I roll, she cuts and arranges on platters.  Inevitably we make a feast so always good to have a hungry, yet patient group to enjoy the fruits of your labors.

Shrimp with Lobster Sauce

Standard
Shrimp with Lobster Sauce served with rice and roasted carrots

Shrimp with Lobster Sauce served with rice and roasted carrots

This is a contribution from a Sophisticated Gentleman.  My brother-in-law enjoys cooking more than my sister does.  This is one of the first dishes that he won her heart (through her picky stomach) with when they were dating.  It is still one of her favorites.  Don’t worry if it turns out differently every time.  It is part of the charm of it all.

It all comes together quickly, so I recommend prepping all the ingredients before you start cooking.  I color-coded ingredients that can be mixed ahead of time so you just have to dump it all in at once.  The bonus is you can taste it and see if you like it or want to adjust it before adding it in. Feel free to play around with the quantities.  If you like more egg, add more.  Like the black bean sauce, add more of that.  If you’re not sure about how to adjust it, think about the individual ingredients – too salty, that is too much soy sauce, so add more black bean sauce.  Black bean sauce is usually in the Asian section of the grocery store, or of course in Asian grocery stores.  Before adding in the water/cornstarch mixture, make sure you give it a fresh stir because it tends to settle in clumps.

Everything prepped and ready since everything cooks up quickly (the bonus, you'll feel like you're on your own cooking show!)

Everything prepped and ready since everything cooks up quickly (the bonus, you’ll feel like you’re on your own cooking show!)

2 T cornstarch (split into ½ T and 1-1/2 T)
2 tsp dry sherry or Shao Zing wine
1 pound shrimp, peeled and deveined
4 T vegetable oil
2 cloves garlic, minced
1 tsp minced fresh ginger
¼ pound ground pork
1 c chicken broth or water
2 T soy sauce
2 T black bean sauce
¼ tsp sugar
¼ c cold water
1 egg, beaten

In a medium bowl, dissolve ½ T cornstarch in the sherryAdd the shrimp to the bowl and toss to coat.  Prep the rest of the ingredients if they are colored, put like colors together.

Heat the wok or large skillet over medium-high heat.  Add the shrimp and fry until pink, about 3-5 minutes, flipping them about halfway through.  Remove the shrimp to a plate, leaving as much oil in the pan as possible.

Add the garlic and ginger to the hot oil, fry for a few seconds.  Then add the ground pork.  Cook, stirring constantly until the pork is cooked and no longer pink.

Combine broth, soy sauce, black bean sauce, sugar and salt in the wok with the pork.  Bring to a boil.  Reduce heat to medium and simmer for 2 minutes.  Mix the remaining 1-1/2 T cornstarch with ¼ c cold water.  Pour in the pan with the pork.  Add back in the shrimp and any juices.  Bring to a simmer and keep stirring.  While stirring, drizzle in the egg and keep stirring until the egg gets mixed into everything as it cooks.  Serve over rice.

Keema with Peas (Peas optional)

Standard
Keema seasoning mix is available in Indian grocery stores

Keema seasoning mix is available in Indian grocery stores

Today we are tackling keema.  It is a lovely flavored ground meat, onion and pea mixture that is super easy to pull together.  If you can brown hamburger, you can make this.  It is a total weeknight dish since all you chop is an onion and you make this all in one dish in less than 20 min.  I serve with with parathas and another vegetable.  Last week we had Arvind’s favorite baked “fried” eggplant.  But that is a recipe for another day.

Usually keema is made with ground lamb.  If that is not something you can get easily or enjoy, substitute it out for other ground meats.  I made it with turkey recently to keep it lean.  You might find that chicken or turkey take a little more seasoning because the meat is a little blander, whereas lamb, hamburger or meatloaf mix have a little more umphf to them.

Next week I will be covering Bengali egg rolls.  Unlike the Chinese food of the same name, these actually have eggs in them.  And you can use your leftover keema in your egg rolls.

For those of you who love kabobs, we’ll cover keema kabobs later.

My apologies that I don’t have pictures of the final dish today.  My photographer left for India today and has all sorts of pictures in his camera.  I will edit this later to include them, so check back later!

Olive oil
1 large onion, small dice
1 T ginger garlic paste (or ½ T minced garlic and ½ T minced ginger)
½-1 T keema seasoning (see picture)
1 pound ground lamb (or ground turkey, ground chicken, hamburger, pork or meatloaf mix)
1/2-1 c water
2 c frozen peas, optional
1 T cornstarch mixed into 3 T water, optional

Here is how I carve out a spot for heating up spices before mixing them into fried onions.  Heating the spices helps make them taste better.

Here is how I carve out a spot for heating up spices before mixing them into fried onions. Heating the spices helps make them taste better.

Heat oil in a skillet and mix in onions.  Cook until they are just starting to brown.  Pull the onions aside to make a small hole in the lowest part of your skillet.  (On my stove, it is off to the side because of my crooked house).  Add a pinch more oil, then add in the ginger garlic paste.  Mash the paste with a wooden spoon to get as much of it touching the skillet as possible.  Let the paste heat up a pinch.  Mix into onions.  Create a new free spot and add a pinch of oil.  Add in the keema mix.  You can go easy on this and add more later if you don’t add enough.  It can get spicy if you do a ton, so go light to start and you can always add more later.  Mix the keema spices and oil and let heat until you can smell the spices heating up.  Then mix into the onions.  Add in the ground meat.  Break up the meat with wood spoon to get small pieces, about the size of peas.  Brown the meat.

You can stop here if the meat is cooked all the way through.  Particularly with lamb, you’ll probably want to keep going because the meat will get more tender with more cooking.  Just test the dish to make sure you like how it tastes.  If it is too bland, add in more keema seasoning.

Add the water and cover.  Cook for 5 min.  Mix in peas and cover up again.  Cook for 5 more minutes.  Take the cover off of the pan.  Check to see if everything is cooked well.  If it is saucy with a thin sauce, mix up the cornstarch/water mixture and add that in as well.  The sauce will thicken up.  If it isn’t as thick as you’d like, add another round of cornstarch/water.  It should be the consistency of taco meat.  Taste it and see if you like how it tastes.  If it is too bland, add more keema spices.

Serve with parathas.  Keep the leftovers for egg rolls (coming next week).